This section explains the procedures and points for course registration using the web course registration system. Please check this section carefully before you register for courses so that you can avoid mistakes.
Pre-Check
●CHECK1: Recommended Environment/Email Settings [1]
●CHECK2: Procedure for Course Registration using the Web System [2]
●CHECK3: Explanation of the Course Registration Screen [3]
Procedure for Course Registration using the Web system
●STEP1: Click “Grades & Course registration” on the MyWaseda Login Screen/Check the List of Registered Courses [4]
●STEP2: Search for Courses [5]
●STEP3: Select a Course [6]
●STEP4: Course Registration [7]
●STEP5: Course Cancellation [8]
●STEP6: Confirm Registered Course List [9]
●STEP7: Confirm Registration Results [10]
TIPS
●TIPS1: Preferred Order Registration [11]
●TIPS2: Category Change/ [12]Course Cancellation [12]
●TIPS3: Courses that Require a Reason for Application [13]
●TIPS4: Audit/Course Enrollment Fees [14]
●TIPS5: Links to Related Websites [15]
●TIPS6: Error Message [16]
CHECK1: Recommended Environment/Email Settings
- Check the recommended browsers for Course Registration.
Please refer to the recommended environment for the systems [17]. - Check your Waseda email settings.
During Web Course Registration, you may receive emails from your faculty office. Please be aware of the following points to ensure that you receive them.
Make sure to obtain a Waseda email address (~@~.waseda.jp).
If you do not have a Waseda email address, you will not be able to register for courses through MyWaseda and will not receive emails related to course registration. If you have forgotten your password to login, you will need to reissue it.
Make sure you have access to Waseda email.
Please make sure that you can send and receive emails using your Waseda email address.
Complete the settings for forwarding emails from your Waseda email to another email address
If you wish to receive emails sent to your Waseda email address at another email address (forwarding address), please complete the necessary setting “Turn on automatic forwarding”.
- Reference
Waseda Mail User Guide (for Student/Alumni) [18]
Waseda Mail (Gmail) Startup Guide [19]
CHECK2: Procedure for Course Registration using the Web Course Registration System
The flow of course registration using the web course registration system is as shown in the diagram below.
| STEP 1 | Log in to the Menu for course guidance week Registration screen/Check the list of registered courses |
|---|---|
| STEP 2 | Search for Courses |
| STEP 3 | Select Course |
| STEP 4 | Course Registration |
| STEP 5 | Course Cancellation |
| STEP 6 | Confirm Registered Course List |
| STEP 7 | Confirm Registration Results |
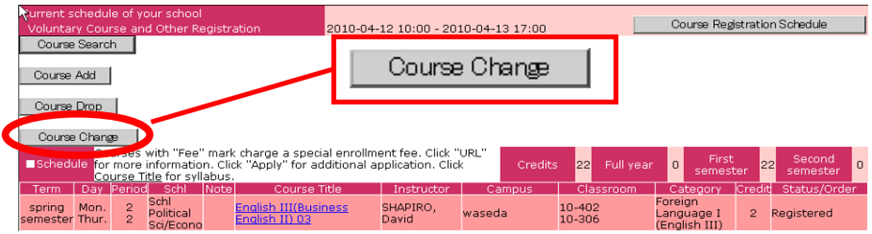
CHECK3: Explanation of the Course Registration Screen of the Web Course Registration System
All web course registration begins from this screen (screen displayed after you log in and select “course registration”). For details on how to log in, please refer to “STEP1: Click “Grades & Course registration” on the MyWaseda login screen/Confirm Course Registration List” page” [4].
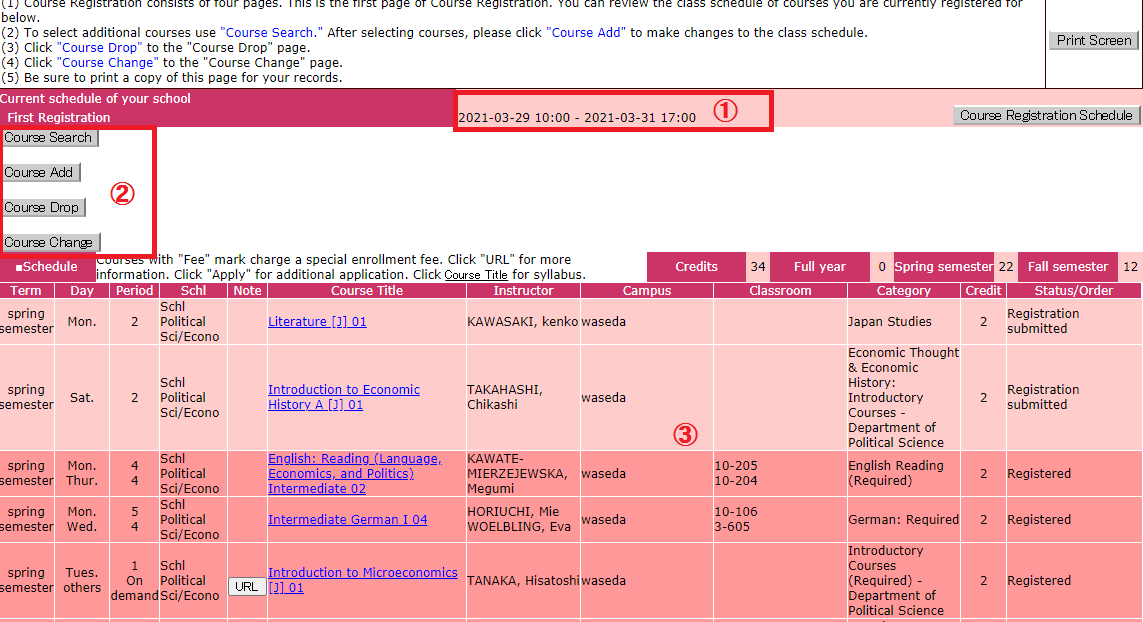 ①Registration period
Application deadlines differ depending on the course. Please check the application period for each course category.
②Function Buttons
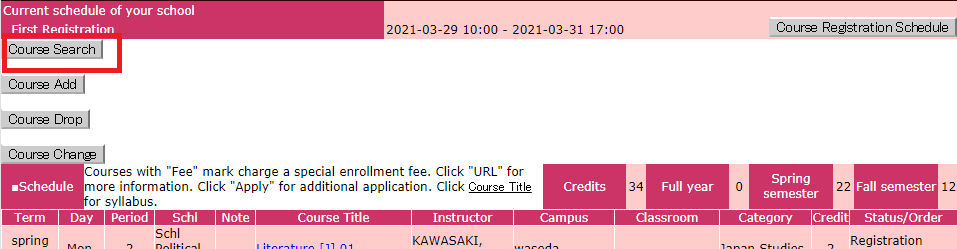
There are buttons for “Course Search” “Course Add” and “Course Drop”.
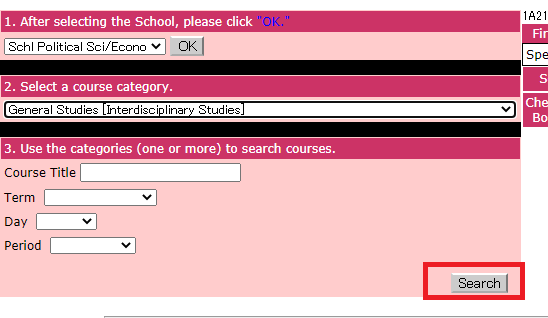
| “Course Search” | Press the “Course Search” button and the screen will change to the “Course Search Screen.” Select a School, press OK and select Course Category. Fill in at least one item in the Search Keyword window. When you press the Search” button, a list of courses you may register for will be displayed (any course that you are not able to register for will not appear). |
|---|---|
| “Course Add” | When you press the “Course Add” button, the confirmation screen for registration of tentatively selected courses will be displayed. |
| “Course Drop” | ・When you press the “Course Drop” button, the confirmation screen for course cancellation will be displayed. Courses that you are able to cancel are those which status is either registered or tentatively selected.
・Some faculties allow students to cancel courses that have already been registered, during a designated period. Please check the course registration guide of your School/Graduate School for details. |
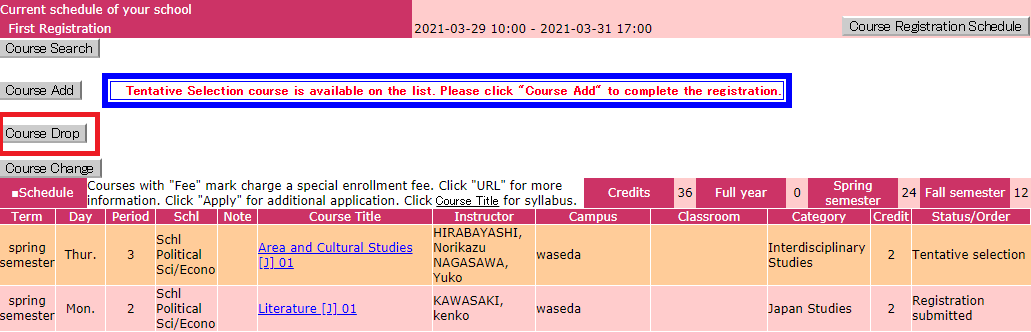
③Status of courses
Status of courses is displayed according to course title. Courses with a ¥ mark in the Note column require a special enrollment fee (if the enrollment fee is not paid by the deadline, your registration will be cancelled).
Status of courses on the Registration Screen will be displayed as follows:
| Status | Explanation |
|---|---|
| Tentative selection | Courses that are tentatively selected during “Course Search” are shown as “Tentative selection”. If you close the screen, the tentatively selected course will be invalid. Tentatively selected courses are possible to cancel. |
| Registration submitted | Courses that you are permitted to register by pressing the “Course Add” button are shown as “Registration submitted”. These courses are possible to cancel. |
| Registered | Courses that have completed registration are shown as “Registered”. (displayed after the course registration announcement). |
| Not Accepted | Courses that were not accepted after “Tentative Selection” or “Registered” status, due to an error are shown as “Not Accepted” (displayed during the announcement period). |
| Registration under review | Courses which are shown as “Registration under review” are in the state of processing after the registration period. Not possible to cancel (displayed after registration period until announcement). |
| Over enrolled | Courses with more applicants than the capacity, and for which the student was not selected during a random drawing of a lottery are shown as “Over enrolled” (displayed during the announcement period). |
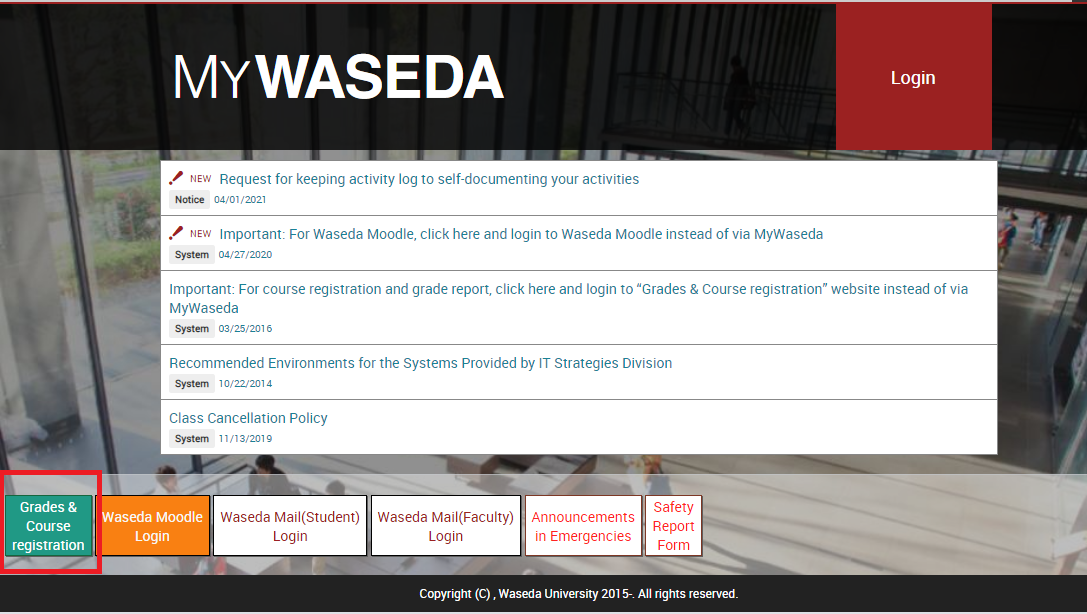
STEP1: Click “Grades & Course registration” on the MyWaseda login screen/Check the list of registered courses
(1) Click “Grades & Course registration” on the MyWaseda login screen. [21]
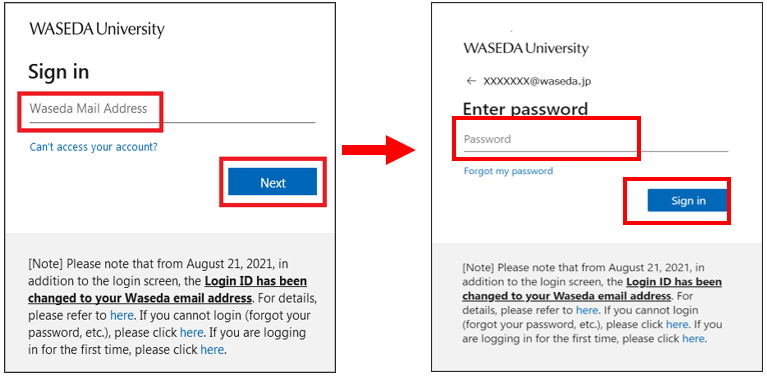
(2) Login with Waseda Mail Address and Password.
(3) Select “Course Registration” from the “Menu for course guidance week.”
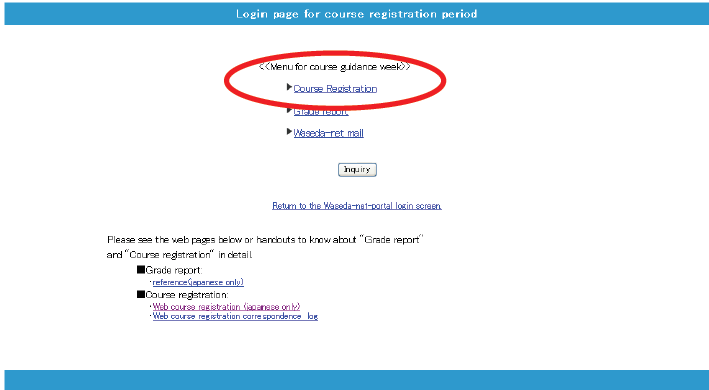
(4) Click “Course Registration” and the “Course Registration Schedule Screen” will be displayed. Confirm the schedule and status of registered courses, including automatically registered courses.
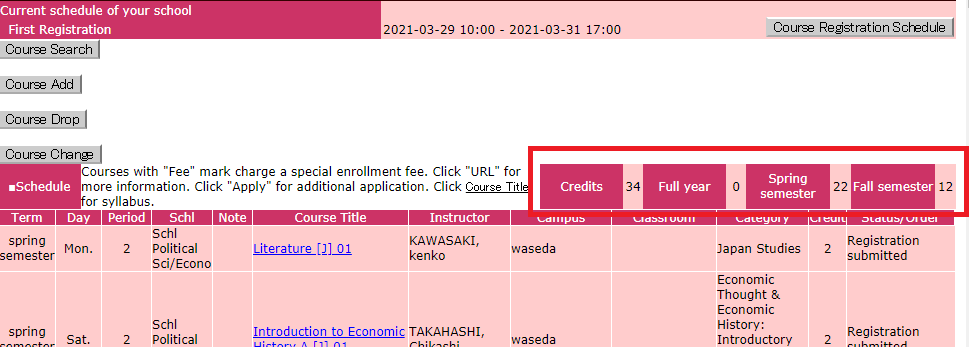
*”Credits” tell you the number of credits counted toward degree requirements. Make sure credits are within the maximum number of credits allowed for registration when registering. “Credits” will be the total number of credits counted toward degree requirements for the full year, spring semester and fall semester.
STEP2: Search for Courses
(1) Click “Course Search” on the screen.
(2) On the search screen, specify the conditions and press “Search”.
STEPS for Searching Courses
- Select School and click OK.
- Next, select the Course Category.
- There must be at least one keyword in order to make a search. After entering, press the “Search” button.
- If you are unable to find the course you were looking for, reconsider your search keywords. Try deleting some keywords, such as Day and Period.
〈FAQs: Course Registration〉Q I cannot find courses on the course registration system. [22]
STEP3: Select a Course
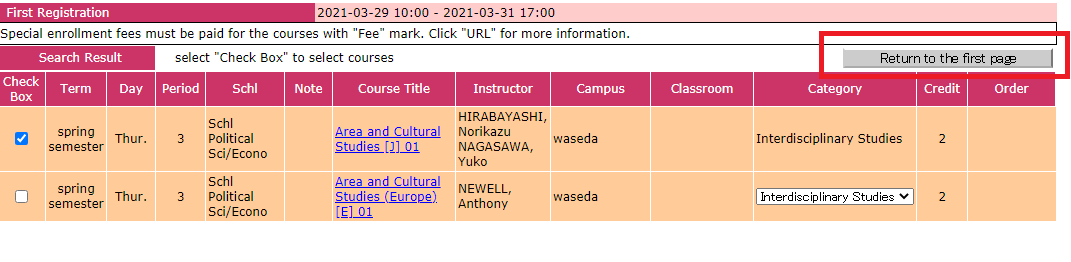
(1) To select a course from the search result, click the Check Box to the left of the course title. You may select more than one course at a time.
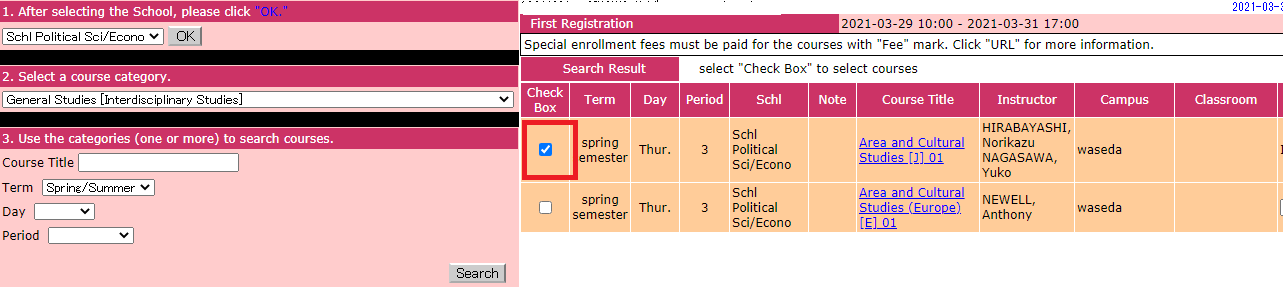
(2) If you want to continue to choose another course, search for the course from the Search Window on the left.
(3) If you want to proceed to register for the courses you have selected, click “Return to the first page” after placing a check in the Check Box. The selected courses will appear as tentative selections.
STEP4: Course Registration
(1) After making your selection, return to the first page. Selected courses will be displayed as a “Tentative selection”. Press the “Course Add” button to register for the course.
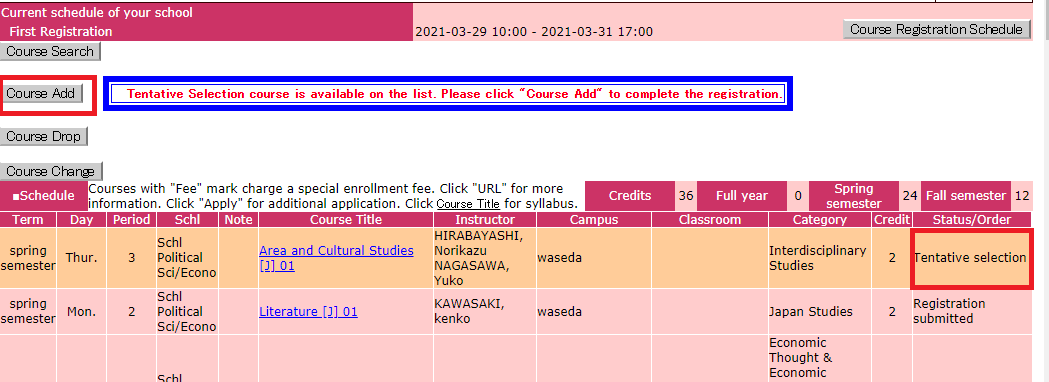
(2) Confirm that the courses you want to apply for are correct, and then click the “OK” button.

(3) When you click the “OK” button, a registration check will run, and it will be determined whether or not you can take the course.
*If there is no error, the status will change from “Tentative selection” to “Registration submitted.”
*If there is an error, the status will change, and an error message will be displayed. Cancel the course, resolve the problem and press “Course Add” once again.
About the Registration Check for Course Registration (Types of Errors)
| Error Display | Reason for Error | Solution |
|---|---|---|
| Duplicate registration error | Trying to add courses already registered for | Unable to add. Cancel the course. |
| Duplicate Order error | Same preferred order number is designated for different courses | Cancel one of the courses with the same order. |
| Duplicate in a day of the week or period | Days and periods overlap for two or more courses [Ref.]03_Course Registration Precaution: NOTE6: Note the Class Modality Categories [23] |
Cancel either course. |
| Prerequisite check error | Prerequisites for registering the course have not been met | Unable to add. Cancel the course. |
| Traveling time error | Not enough time for traveling from campus to campus between classes [Ref.]03_Course Registration Precaution: NOTE6: Note the Class Modality Categories [23] |
Delete either course. |
| Credit-limitation error | Adding more credits than maximum number of credits allowed for registration | Cancel either course or continue with the registration despite the error.
*You will be able to submit your registration without resolving the Credit-limitation error, but a randomly chosen course will be cancelled instead. |
*There are possible errors other than the above. Please refer to materials such as the Course Registration Guide to resolve any problems.
*The names of the errors displayed on the screen may differ slightly depending on the School/Graduate School/Center.
*When online classes exceed half of the total class time, they are classified as “Online Courses”. At the undergraduate level, there is an upper limit on the number of “Online Course” credits that can be counted toward graduation, however, the course registration system does not check the maximum number of online courses (60 credits) that can be counted toward graduation, so please take care yourself not to exceed the limit. To find out which classes are classified as “Online Courses”. please refer to the “Class Modality Category” on the syllabus for each course.
●NOTE6: Note the Class Modality Categories. [24]
(4) The courses which status is “Registration submitted” are the courses for which your application for registration has been confirmed.

*When you close the screen, the information of the “Tentative selection” subject will be discarded. If you want to register the courses, please make sure to confirm your application by clicking the “Course Add” button.
●Change of course categories
When registering for a course, you may be able to select the classification of the course. In addition, you may be able to change the classification of courses for which you have been approved for registration within a specified period of time as determined by your School/Graduate School. Please check the course registration guide of your School/Graduate School for the applicable courses and time period.
●Cancelling courses that are “Registered”
Some courses that have been successfully registered (shown as “Registered”) cannot be cancelled. For “Registered” courses that can be cancelled, the cancellation period may differ depending on the course.
For details, please refer to the following pages.
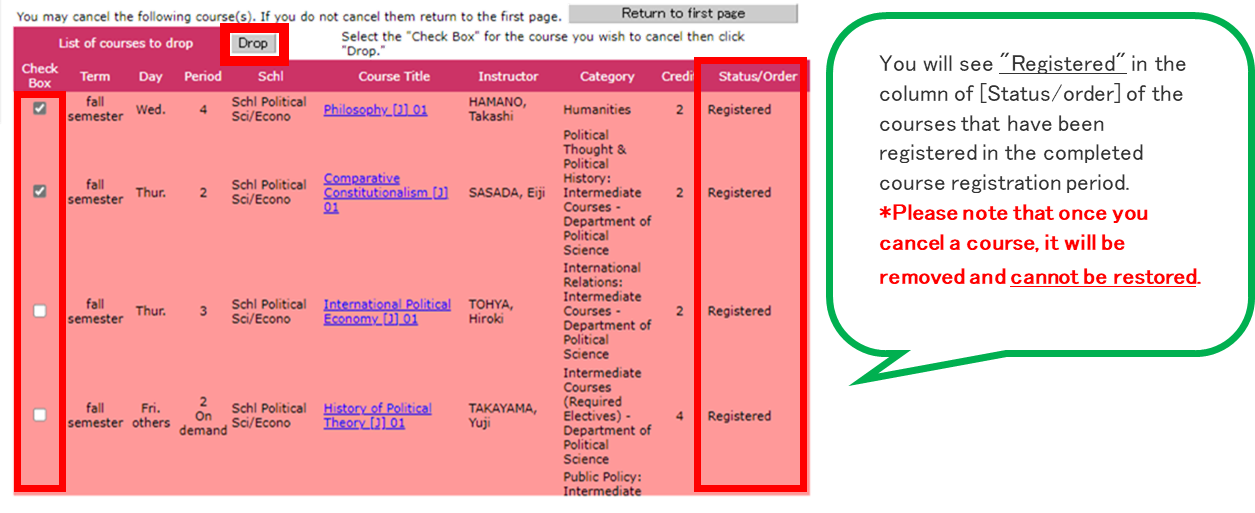
STEP5: Course Cancellation
●Cancelling courses that are marked as “Tentative selection” or “Registration submitted”
(1) During the registration period, courses with the status of “Tentative selection” and “Registration submitted” can be cancelled.

(2) To cancel a course, click the “Course Drop” button.
*When you press the “Drop” button, a confirmation message will appear.

●Cancelling courses that are “Registered”
Some courses that have been successfully registered (shown as “Registered”) cannot be cancelled. For “Registered” courses that can be cancelled, the cancellation period may differ depending on the course.
STEP6: Confirm Registered Course List
You can check the details of your application on the first page of Course Registration. The courses with the status “Registration submitted” are the courses that have been accepted for registration during the course registration period.
- STEP1: Click “Grades & Course registration” on the MyWaseda login screen/Check the list of registered courses [4]
- *For the final registration result. Please check STEP7 [10] for the final registration results.
- *The Web Course Registration daily mail that was sent until AY2024 was discontinued from AY2025.
STEP7: Confirm Registration Results
On the day that course registration results are announced, you will be able to check the registration results of the courses you applied for on the Web Course Registration screen. Courses that were approved for registration will be marked as “Registered,” courses that were not approved as a result of the lottery will be marked as “Over enrolled,” and courses that could not be registered due to a registration error will be marked as “Not Accepted”.
- How the status of courses on the Registration Screen will be displayed [27]
- Payment of Audit/Course Enrollment Fees [28]
TIPS1: Preferred Order Registration
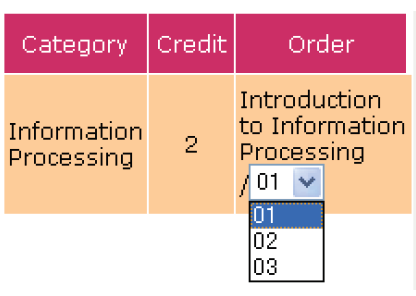
Preferred Order Registration is a method in which multiple registrations are made for courses that are likely to fill beyond capacity and require a lottery for seats.
You may list courses in the order you prefer in a pull-down menu. When you select an order for the courses, always begin with 01 (first choice). If you select only 02 (second choice), the drawing for this choice will be processed after the lottery for the students with first choices has been completed, meaning that the possibility for registering for the course will be extremely low.
TIPS2: Category Change/Course Cancellation
You may change the course classification or cancel the registration of courses during the designated period specified by your School/Graduate School.
●Category Change
The Web Operation method for Category Change are differs between the registration period (1.) and the category change application period (2-1, 2-2)
✏MEMO
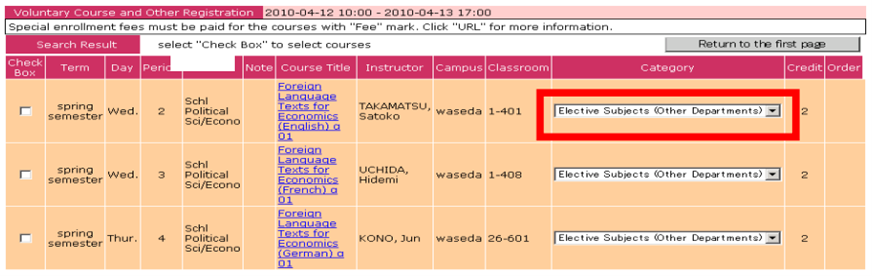
*When choices of category are available in a pull-down menu, you may change the course category for your course registration. For example, if a course registration limit has been exceeded and an error occurs, you may cancel the application, and as a new application, you can change the course category to one that does not count toward the limit.
1. During the registration period (Category Change)
When choices of category are available in a pull-down menu, you may change the Category and register for a course.
2-1. During the period to apply for category change (Jump to Change screen)
Press the [Course Change] button.
2-2. During the period to apply for divisional changes (Changes to course category)
A list of courses that you can change the category will be displayed. Click the Check Box of the course you want to change and press the “Change” button. When you press the “Change” button, a confirmation message will appear.

●Course Cancellation
After the end of the course registration period, it may be possible to cancel courses that have already been decided. Courses that do not appear as eligible during the course cancellation period specified by your School/Graduate School may not be eligible for cancellation. See the document below for more details.
【PDF】Information Regarding Courses that Cannot Be Cancelled and the Schedules for Course Cancellation [29]
*If you apply for cancellation of a course that has already been approved as “Registered”, you will not be able to apply for registration for the course again during the same course registration period. When applying to cancel a course, please do so carefully.
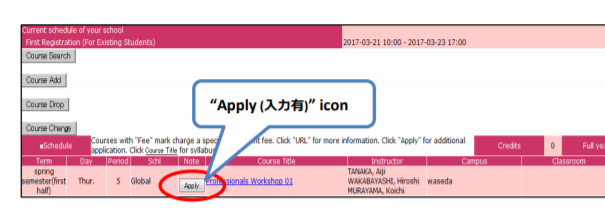
TIPS3: Courses that Require a Reason for Application
Courses with an “Apply” button in the Note column of the course search screen are courses that require you to open an “Application Form” from a separate screen and enter information such as the reason why you applied for the course.
*Please note that if the application form is inactive for 120 minutes, the session will be terminated, and you will need to open a new form again.
TIPS4: Audit/Course Enrollment Fees
When “Fee” is displayed in the Note column on the Search Result screen, special enrollment fees must be paid for the courses.
Please note that the auditing fee for most of the automatically registered subjects are included in the tuition at the time of enrollment. In such cases, you do not need to pay the fee.

TIPS5: Links to Related Websites
When “URL” button is displayed in the Note column on the Search Result screen, there are websites available that are related to the course.
Click “URL” button and you will be linked to the related website.

TIPS6: Error Message
This section explains how to respond when the following message is displayed.
| Error Display | Solution |
|---|---|
| A problem has occurred. | Please fill out and send a “Question Forms” to the support desk. |
| When an operation is not accepted. | Please close all browsers, and login again from the “Login page for course registration period.” |
| Service is not available due to periodic maintenance. | To optimize the Course Registration System, a time has been set for daily maintenance.Please try again later. |
| Now processing. Click “OK” return to Course Registration. | If you press the same botton more than once, this mesasge will be displayed. Please press the “OK” botton and wait until the process finishes. |
■ページトップへ戻る [20]