01-02-01. Edit the Dashboard
[ PREVIOUS ] < | > [ N E X T ]
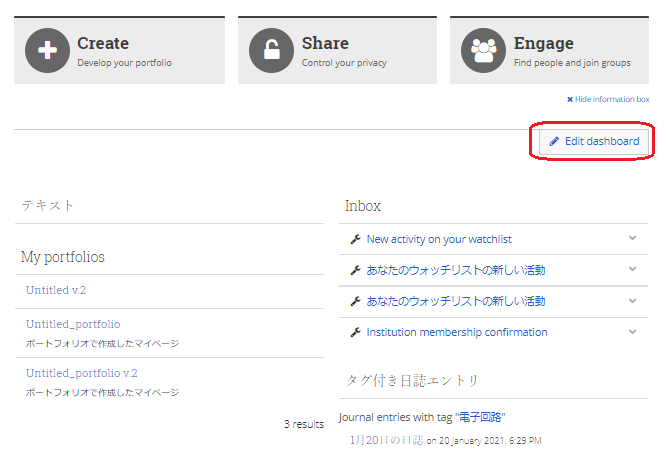
Click the “Edit Dashboard” button at the bottom of the dashboard screen to open the edit screen.
Here you can edit how your page will look like.
Fig: E1-2-1-1
Screen Introduction
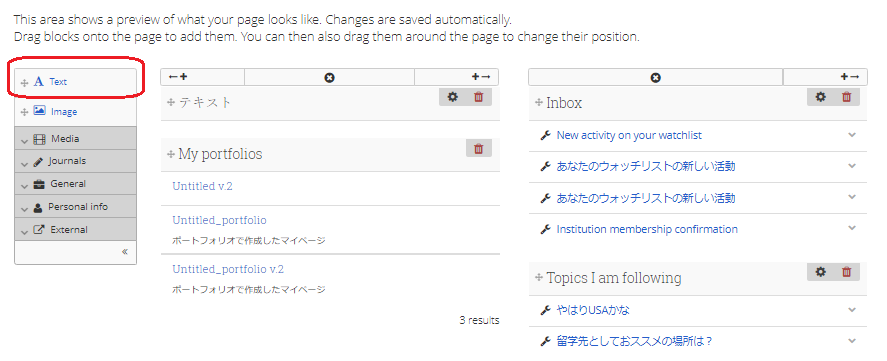
The dashboard editing screen initially looks like the following.
* Go to the Portfolio page.
Fig: E1-2-1-2
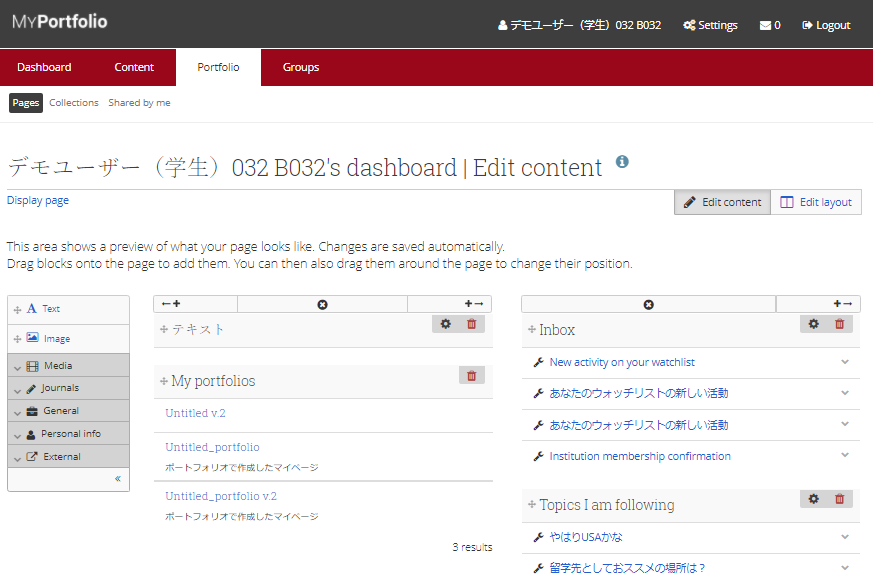
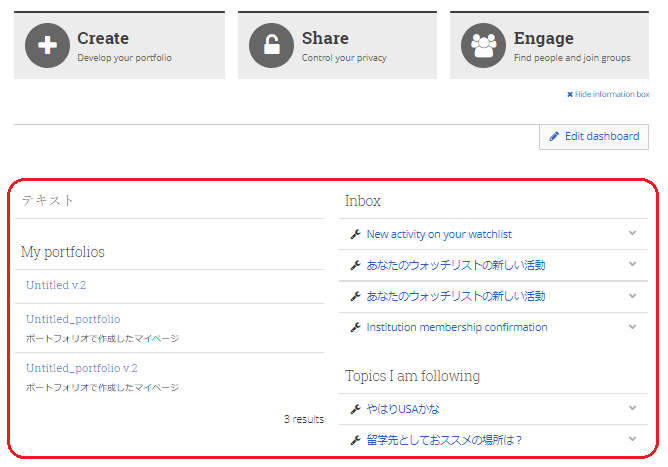
The initial screen is the “テキスト”(means Text), “Inbox”, “My portfolios”, and “Topics I am following” editing screens.
The following areas of the dashboard screen are covered.
Fig: E1-2-1-3
Edit text
If you want to edit an existing text area, click the gear icon in the text area.
Fig: E1-2-1-4

After clicking, the Text Settings screen will open.
Fig: E1-2-1-5
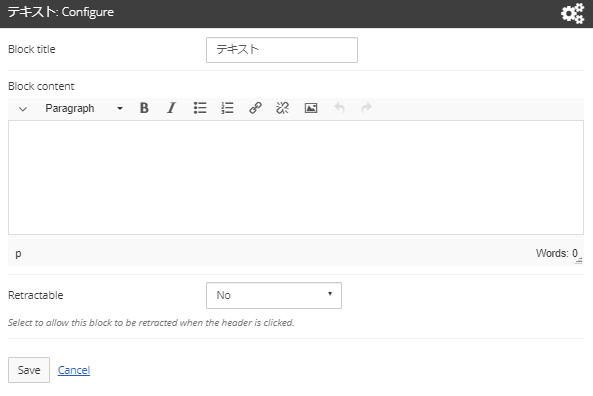
Block title:
Edit the title to be displayed in the header section.
Block content:
Edit the text to be displayed in the text block.
Edit the wording to be displayed in the text block.
Bold, italic, bullets, numbered bullets, add and remove links, and modify with images are available with various icons.
Retractable:
Specify Yes if you want to be able to store the block contents by clicking on the header.
The default is No, which means it will always be visible.
If you specify “Automatically retract”, the content will be stored immediately after opening the dashboard.
After editing the necessary information, click the “Save” button to apply the updated information.
If you want to cancel the editing, click “Cancel”.
Add new content
To add a new content, select the content you want to add from the left side.
(1) Add a new text area
If you want to add a new text area, click “Text”.
Fig: E1-2-1-6
Click to open the dialog box and decide where you want to add the text block.
Fig: E1-2-1-7
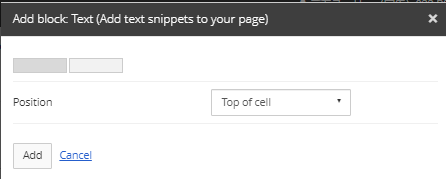
The top two boxes refer to the columns on the screen, and specify whether you want to add them to the left or right column.
If you choose left, it will be added to the left side of the screen (Text, the column where My Portfolio is displayed), and if you choose right, it will be added to the right side of the screen (Inbox, the column for topics you are following).
Position:
Use the pull-down list to specify where on the top and bottom of the screen you want to add it.
If you select “Top of cell”, it will be added to the top of the column, and if you select “Bottom of cell”, it will be added to the bottom of the existing block.
Once you have decided on the location, click the “Add” button to add the block.
After adding the block, the operation is the same as “Edit Text”.
You can also drag and drop the “Text” section to set it up in the same way.
(2) Add an image area
To add an image area, select “Image” from the menu on the left, just as you do for text.
The position for adding blocks is the same as for text areas.
You can also drag and drop.
Fig: E1-2-1-8
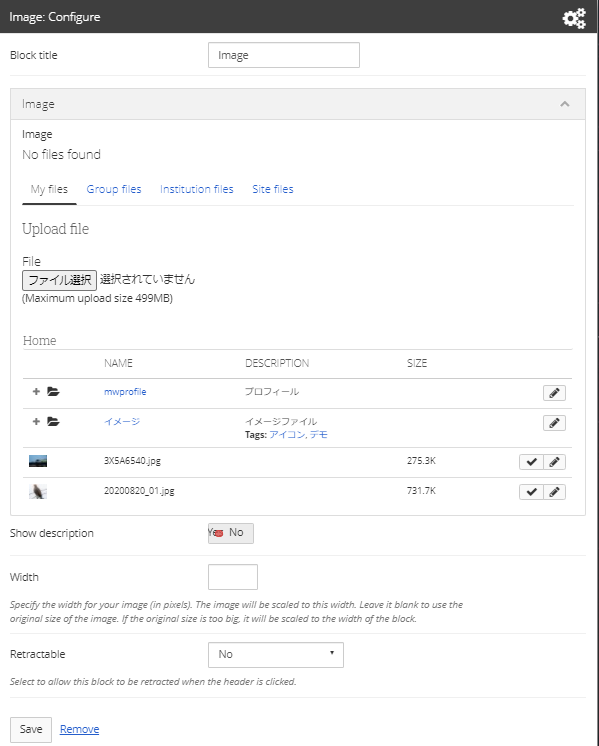
Block title :
Edit the title to be displayed in the header section.
Image:
Specify the image to be displayed on the dashboard.
Specify the image to be displayed on the dashboard.
It is also possible to upload a new file in this screen.
Display description:
Specify the description of the file to be displayed on the dashboard.
Specify Yes if you want the description of the file to be displayed on the dashboard.
Width:
Specify the width at which the specified image will be displayed.
Retractable:
Specify Yes if you want to be able to store the block content by clicking on the header.
The default value is No, which means that the content is always displayed.
If you specify “Automatically retract”, the content will be stored immediately after opening the dashboard.
After editing the necessary information, click the “Save” button to apply the updated information.
If you want to cancel the editing, click “Cancel”.
(3) Open “Media”
When you open “Media”, you will see the following screen.
The position of each block can be determined in the same way as for the text area.
Or you can drag and drop.
Fig: E1-2-1-9
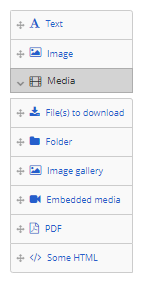
File(s) to download:
You can select files from a folder that other users can download and display them.
The specification method is the same as for images, but there is no width specification.
Folder:
You can display the contents of a folder.
The specification method is the same as for images, but there is no width specification.
Image Gallery:
Allows you to create an image gallery.
The difference between “Image” and “Image Gallery” is that “Image Gallery” allows you to specify dynamic images and multiple files.
Fig: E1-2-1-10

In the “Image selection” menu, select “Display all images from a folder including images uploaded later” if you want to see all images in the folder.
In this case, images uploaded later will also be displayed.
In “Choose individual images to display”, you can specify multiple images.
If you select “Display images from external gallery”, specify the URL or RSS feed of the external gallery.
Style:
Choose to display the specified image as thumbnail, thumbnail (square), or slideshow.
The rest is the same as “Image”.
Embedded Media/PDF/HTML is used when you have video, PDF, or HTML data that you want to embed in the dashboard.
(4) Open “Journal”
When you open “Journal”, you will see the following screen.
The position to add a block is the same as in the text area.
You can also drag and drop.
Fig: E1-2-1-11
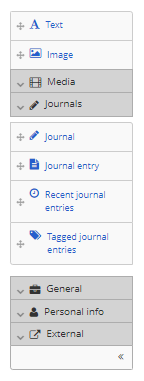
To display the journal on the dashboard, you can choose from the following options.
a) Display by “journal”
b) Display by “journal entry”
c) Display as “Recent journal entries”
d) Show “Tagged journal entries”
a) To display in journal units.
Fig: E1-2-1-12
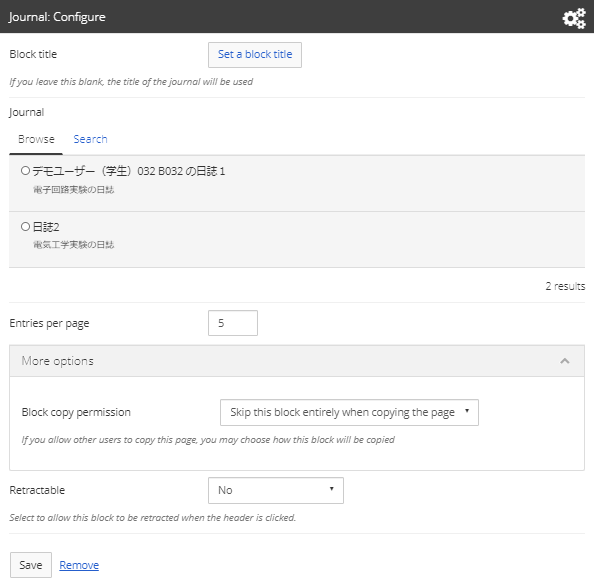
Block Title:
Set the title of this block to be displayed on the dashboard.
If none is specified, the title of the selected journal will be displayed.
Journal:
Specify the journal you want to display.
Entries per page:
Set the maximum number of entries to be displayed in this block.
Advanced options:
If you have made this page available for other users to copy, you can specify about copying this block.
You can choose to skip it completely / allow other users to view it on their own pages / allow other users to copy it on their own pages.
Retractable:
Specify Yes if you want to be able to store the block content by clicking on the header.The default is No, which means it will always be visible.
If you specify “Automatically retract”, the content will be stored immediately after opening the dashboard.
After editing the necessary information, click the “Save” button to apply the updated information.
If you want to cancel the editing, click “Cancel”.
b) To display a “Journal Entry,” it is the same as for a journal, except that you must specify a journal entry instead of a journal.
c) “Recent journal entries” displays the most recent entries from the specified journal, rather than a specific journal or journal entry. The rest of the settings are the same as for the journal.
d) “Tagged journal entries” shows the journal entries with the specified tag.
You can specify the number of items to be displayed from 1-100, and select whether to display only the title or the entire entry.
The rest of the options are the same as for the journal.
(5) Open “General”
When you open “General”, you will see the following screen.
The position for adding a block is the same as for the text area.
You can also drag and drop.
Fig: E1-2-1-13
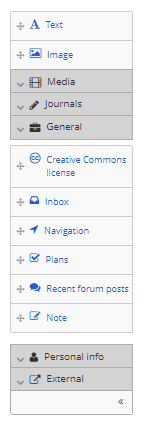
Creative Commons License:
Set the copyright notice for the user’s work.
Allow commercial uses of your work? (Yes/No)” and “Allow modifications of your work? (Yes/Yes, as long as others share alike/No)” and “License Version (3.0/4.0)”.
For the license version, please check the following URL
https://creativecommons.org/
Inbox:
Configure the settings for the Inbox.
Refer to 1-4-2 for the setting details.
Navigation:
You can select and place the collections you want to view from your portfolio.
Plans:
Allows you to select and place the plans that the user has.
Recent Forum Posts:
You can select one of the groups you are a member of and place the recent forum posts of that group.
Notes:
This is where you can place your notes.
Notes can be used as a simple notepad or free book.
The method of creating content is the same as for notes in section 2-9-1, so please refer to section 2-9-1.
You can also select a note that has already been created by clicking the “Use contents of another note” button.
(6) Open “Personal info”
When you open “Personal info”, you will see the following screen.
The position for adding a block is the same as for the text area.
You can also drag and drop.
Fig: E1-2-1-14
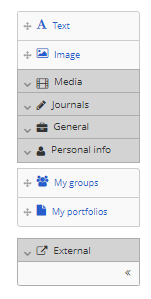
My groups:
Displays a list of groups that the user is a member of.
My portfolios:
This is displayed by default, and is usually not used since it cannot be displayed twice.
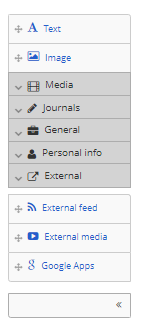
(7) Open “External”
When you open “External”, you will see the following screen.
The way to decide where to add a block is the same as for the text area.
Or you can drag and drop.
Fig: E1-2-1-15
External feeds:
Allows you to place external RSS feeds.
Fig: E01-02-01-16
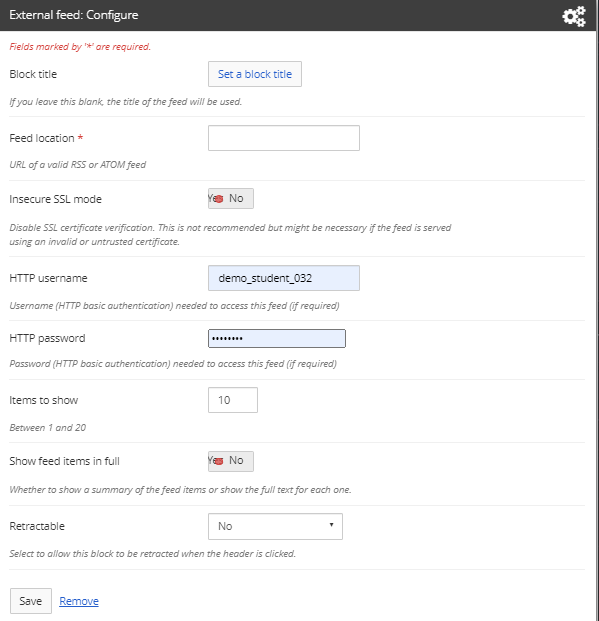
Set the title of the block to be placed in “Block title”.
If nothing is set, the title of the feed will be used.
Specify the URL of the RSS feed or ATOM feed in “Feed location”.
Set “Insecure SSL Mode” to “No”.
If the feed provider has an invalid or untrustworthy SSL certificate, setting this to Yes will allow you to receive the feed, but is not recommended from a security perspective because it will disable SSL authentication.
The “HTTP username” and “HTTP password” fields allow you to set the user name and password required to access the feed.
Set the number of items to be displayed on the screen in “Items to show”.
The “Show feed items in full” setting determines whether you want to see a summary or the full text of the items.
External Media:
Allows you to paste external media.
Fig: E01-02-01-17
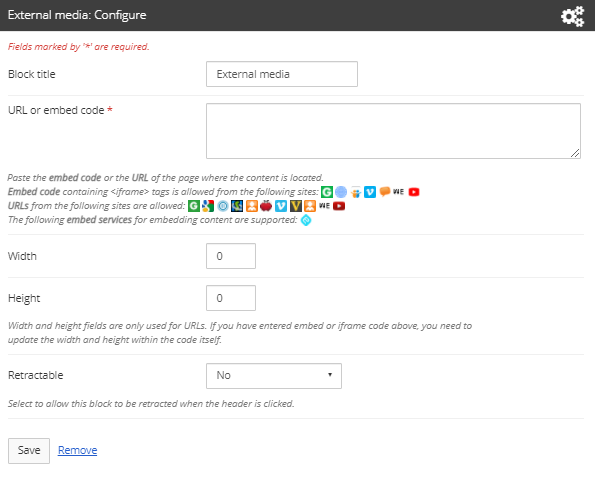
Set the title of the block to be displayed on the dashboard in the “Block title” field.
Paste the embed code or URL of the content you want to embed in the “URL or embed code” field.
For the embed code, please check the embed URL of each service.
For example, if you want to embed a YouTube video, please refer to “Self introduction Video” in section 2-1-5.
In the “Width” and “Height” fields, set the width and height of the media to be pasted here.
Google Apps:
You can paste the Google Apps.
Fig: E01-02-01-18
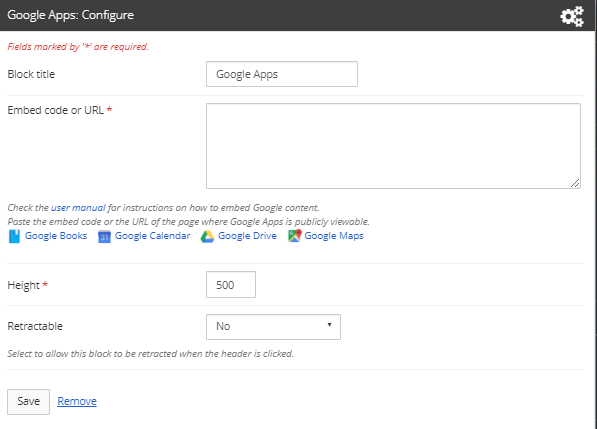
Set the title of the block to be displayed on the dashboard in the “Block title” field.
Paste the embed code or URL of the app you want to embed in the “Embed code or URL” field.
For the embed code, please refer to the mahara user’s manual.
https://manual.mahara.org/en/16.10/blocks/external.html#google-apps
Set the height of the app to be displayed in the “Height” field.
< Manual TOP > [ MyPortfolio ] < Page TOP >
- Title: 01-02-01. Edit the Dashboard
- Category: 01. Dashboard
- Page ID: en-student-mp010201

