06-02-01. Creating a quiz
- Note
- Each time you create a question of a quiz, click . When you finish creating all questions, click . Clicking alone does not complete the creation of a quiz.
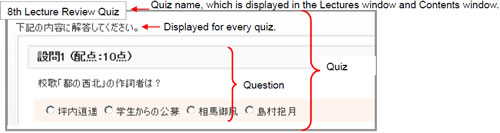
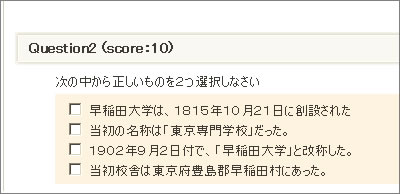
Suppose you create a quiz like the one shown below.
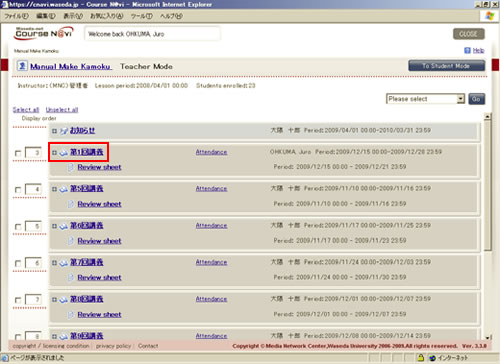
- In the Lectures window, click the lecture folder for which you want to create a quiz.
- Memo
- You can create a quiz not only in a lecture folder but also directly in the My Courses. You can also create a folder and create a quiz in that folder.
- The information of the selected lecture folder is displayed.
From the operation list box, select [QuizMake] and click .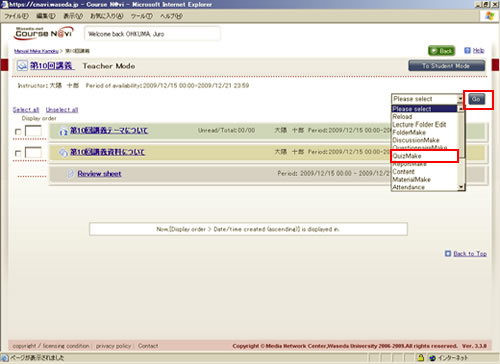
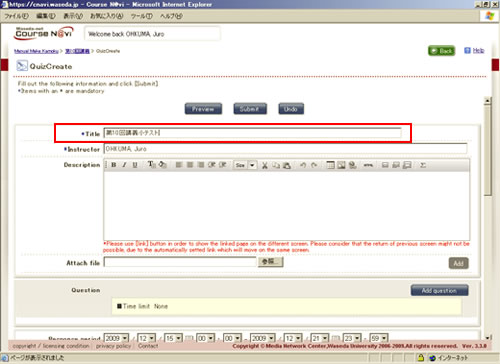
- In the QuizCreate window, enter the title of the quiz in "Title."
- Reference
- Items in the window ⇒ "Items in the QuizCreate window"
- Enter a description as necessary, and set a question. Click .
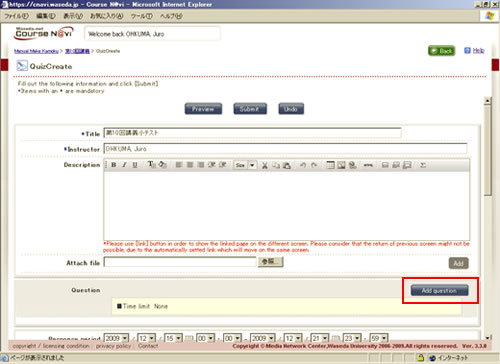
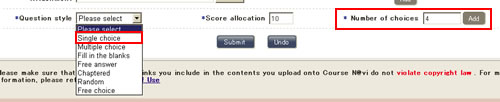
- The QuizQuestionCreate window appears. Select the question style. (In this case, select Single choice.)
Enter values in [Score allocation] and [Number of choices], and click .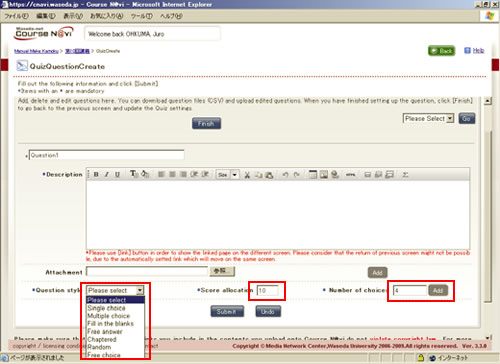
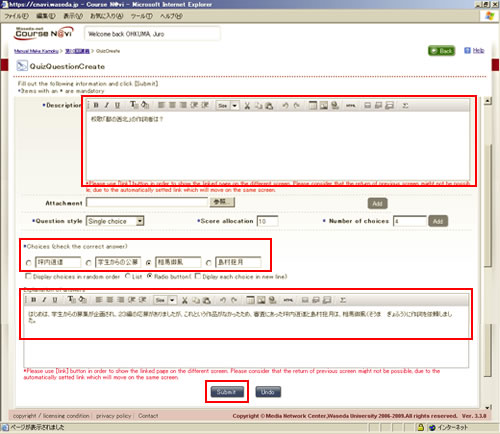
- Enter the description and choices, check the correct answer, and click .
- Memo
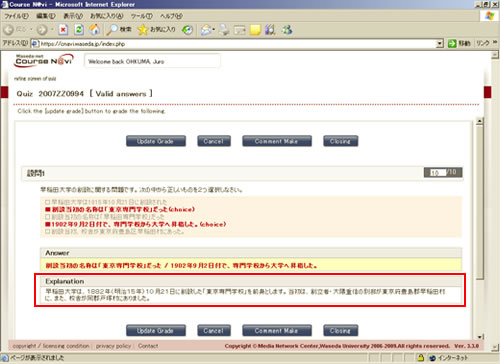
- In "Explanation of answers," you can enter the explanation of the answers of the quiz.
If you do not check [Yes] for [Show grade to student?] in the [QuizCreate] window after creating all questions for the quiz, students cannot view the explanation.
Students cannot view the explanation outside the grade disclosure period.
- The QuizQuestionCreate window appears for Question 2.If you want to create another question, proceed to set Question 2.
If you have finished setting questions, click .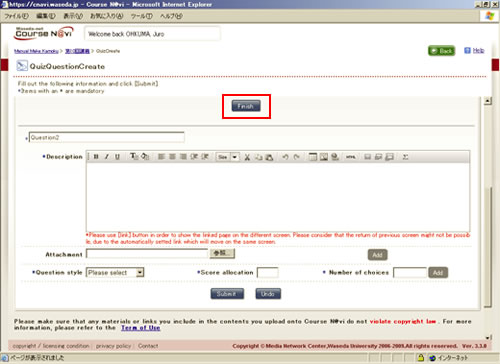
- The QuizCreate window appears again. If there is nothing to change, click . Clicking allows you to see how the created quiz will be displayed.

- The confirmation window appears. If there is nothing to change, click .
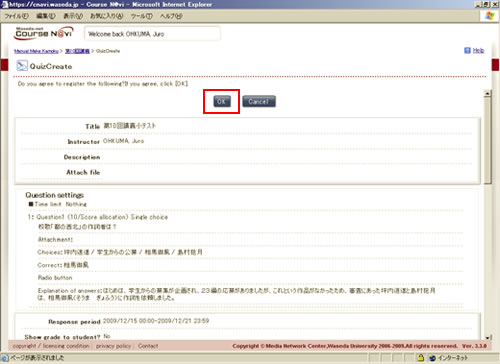
You have successfully created a quiz.
- Memo
- You can change questions even after submitting a quiz. Note, however, that if any student has already answered the questions, you may not be allowed to make changes because doing so may make the data inconsistent.
- 【Items that cannot be changed】
- Addition, deletion, rearrangement, and copy of questions (choices)
- CSV uploading of questions (choices)
- Change in the question style (e.g. from Single choice to Free answer)
- Change in the number of choices for a single-choice or multiple-choice question
- Change in the number of blanks for a fill-in-the-blanks question
- Change in the character number check method
- Change in the number of random questions
- If a change to any question setting item alters scores, that change is not reflected on the submitted answer data.
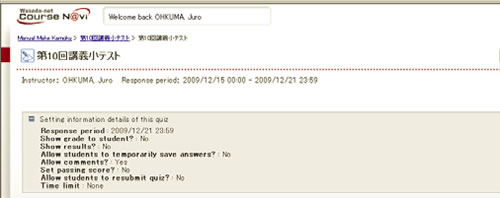
- Check how the quiz is shown to students.
Items in the QuizCreate window
| Item | Description | Remarks |
|---|---|---|
| Title | Title of the quiz | Required. |
| Description | Description of the quiz |
(1) You can decorate the text. |
| Attach file | Specify the material (file) to be referred to by the student for the quiz as a whole. | Click and specify the file. If you want to attach more than one file, click and specify another file. To delete an attached file, select the file and click . |
| Response period | Specify the period during which the students can answer the quiz. | When omitted, this period becomes the same as the display period of the lecture.
|
| Show grade to student?/Show results?/Period | Set whether to disclose the grade and calculation results. Also specify the period during which they can be viewed. | When omitted, this period becomes the same as the open period of the lecture.
|
| Allow comments? | Specify whether to make comments on the answers to the quiz. | Check "Yes" to make comments. |
| Allow students to temporarily save answers? | Specify whether to permit saving of the quiz answers temporarily. | Check "Yes" to permit saving.
|
| Set passing score? | Set whether to set the passing score. | When setting the passing score, select [Yes] and enter the passing score. |
| Allow students to resubmit quiz? | Set whether to allow students to resubmit the quiz. | You can select [Yes], [Only when they fail], or [No]. |
| Notify students when comments are made on their answers? | E-mail is sent to the student when there is a comment on his or her answer. | |
| Notify of new answers by e-mail? | Set whether to send e-mail to notify the student that his or her answers have been received. | When the teacher is checked, e-mail is sent to the address registered in E-mail Address 1 of the profile. A different address can be specified for each group social position. If you select [Send notice to (specify address):], you can specify the address to which e-mail is to be sent. |
| Post an announcement about the Quiz? | A notice is sent to indicate that a quiz has been created. | A notice is registered to indicate that a quiz has been posted. You can select [Yes], [Yes (sent an e-mail as well)], or [No].
|
| Display in list? | Specify whether to display or hide the quiz in the list in student mode. | Check "Display" to display the quiz in student mode. Otherwise, students cannot view the quiz even during the response period. |
| Display settings | Setting of screen display method of the quiz | Set [List in order of:] and [Number of items to display on one page:]. |
| Authorization | Setting of the access authority |

- Memo
- The information set in student mode can be checked.
Question styles and time limit of a quiz
| Question style | Select the form of the question. | [Single Choice]: A single answer is to be selected out of multiple choices. [Multiple Choice]: Multiple answers are to be selected out of multiple choices. [Fill in the blanks]: Blanks in a sentence are to be filled. [Free answer]: The answer is to be written freely. [Chaptered]: Major questions and minor questions are combined. [Random]: Questions are randomly displayed out of multiple questions. [Free choice]: A question is to be selected and answered out of multiple questions. |
|---|
A: Selecting "Single choice"
- Enter the number of choices and click .
- Then, you can enter selections, specify the display format of the choices, and explanation of the answers.
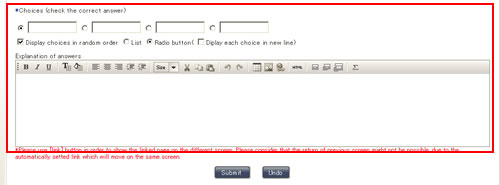
- Selection: Enter choices, and check the correct answers.
- Display format of the choices: Specify the display format of the choices.
[Display choices in random order] Each time the answering window of the quiz is displayed, the order of choices is changed randomly. [List] The choices are displayed in a pull-down list. [Radio button] The radio buttons are provided to the choices and the respondent is supposed to check the answer. [Display each choice in new line] Each choice is displayed in one paragraph. - Explanation of answers: Write the explanation about the question and answers.
B: Selecting "Multiple choice"
<Image of the question>
- Enter the number of choices and click .

- Then, you can enter selections, specify the display format of the choices, and explanation of the answers.
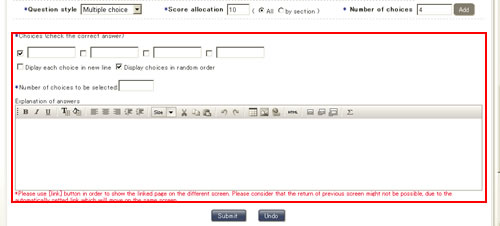
- Selection: Enter choices, and check the correct answers.
- Display format of the choices: Specify the display format of the choices.
[Display each choice in new line] Each choice is displayed in one paragraph. [Display choices in random order] Each time the answering window of the quiz is displayed, the order of choices is changed randomly. - Number of answers to be selected: Specify the maximum number of answers that can be accepted.
- Explanation of answers: Write the explanation about the question and answers.
C: Selecting "Fill in the blanks"
<Image of the question>

- Enter the number of choices (number of blanks) and click .

- Then you can enter the Selection size and Answering pattern.
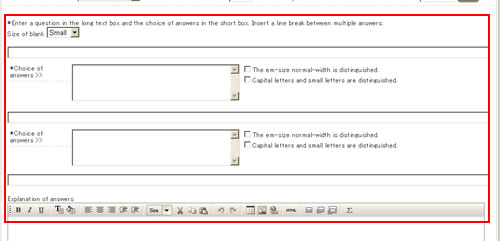
- Size of blank: Specify the size of the blank field.
- Question text: Type text to be the question.
- Answer pattern: Enter the alternatives of the correct answer to be filled in the blank. By feeding a new line, you can enter multiple alternatives. An answer that exactly matches one of the alternatives input in this field will be handled as a correct answer.
- The em-size normal-width is distinguished.: Check this box to distinguish between em-size and en-size characters in answers.
- Capital letters and small letters are distinguished.: Check this box to distinguish between capital letters and small letters in answers.
- Explanation of answers: Write the explanation about the question and answers.
D: Selecting "Free answer"
<Image of the question>
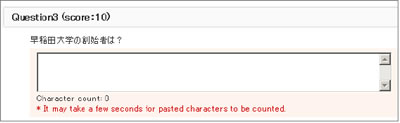
- Select [Free answer].

- You can enter the maximum characters of the answer and explanation.
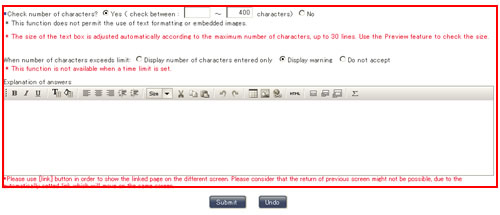
- Check number of characters?: Limit the number of characters to be displayed on the answering window.
- Memo
- The number of characters is counted and displayed as the student enters text for the quiz.
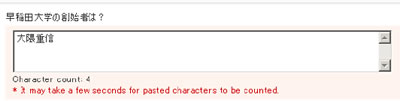
- When number of characters exceeds limit: Select how to warn when the number of characters exceeds the limit.
You can select "Display number of characters entered only," "Display warning," or "Do not accept." - Explanation of answers: Write the explanation about the question and answers.
E: Selecting "Chartered"
<Image of the question>
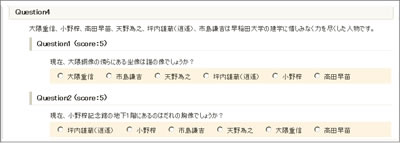
- Select [Chartered].

- You can create subordinate questions. Create a subordinate question in the same way as you create a question.
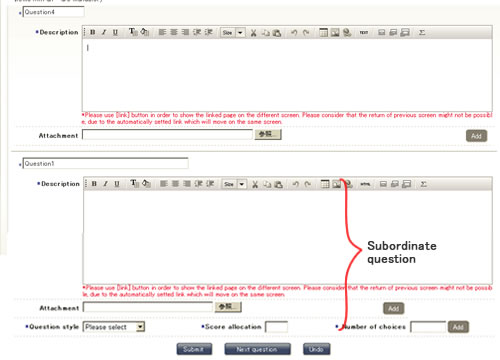
- : Registers the subordinate question.
- : Displays a window for creation of the next subordinate question.
- Undo: Returns the subordinate question creation window to the initial state.
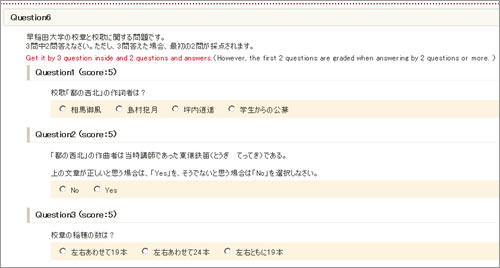
F: Selecting "Random"
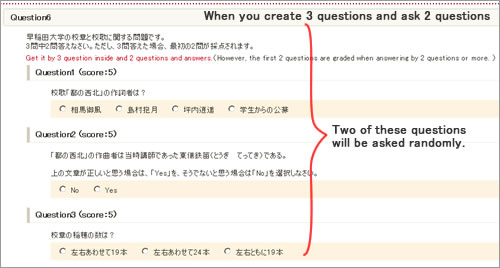
- Select [Random].

- You can enter the number of questions and alternative questions.
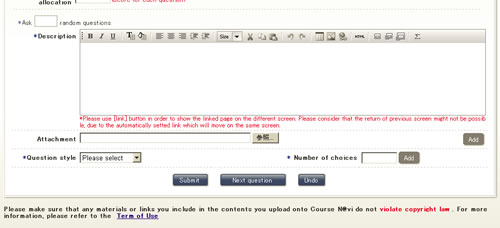
questions to be asked randomly: Specify the number of questions to be asked out of the created alternative questions.
- : Registers the alternative question.
- : Displays a window for creation of the next alternative question.
- : Returns the alternative question creation window to the initial state.
G: Selecting "Free choice"
<Image of the question>
- Select [Free choice].

- You can enter the number of questions to be selected and questions to be asked.
questions to be selected: Specify the number of questions to be selected and answered out of the provided questions.
- : Registers the question.
- : Displays a window for creation of the next question.
- : Returns the question creation window to the initial state.
H: Time limit
You can set a time limit for a quiz.
You can select "None," "Set individually," or "Total.".
The maximum time limit is 1:59:59.

It is displayed to the student as shown below.


