05-01-05. Managing the review sheet
The Lecture Evaluation (review sheet) is used by students to enter feedback on lectures or the level of understanding as well as by teachers to view such feedback and enter comments.
Using the Lecture Evaluation
To use the Lecture Evaluation you need to set “Yes” for the “Use Lecture Evaluation?” option when creating a lecture folder.
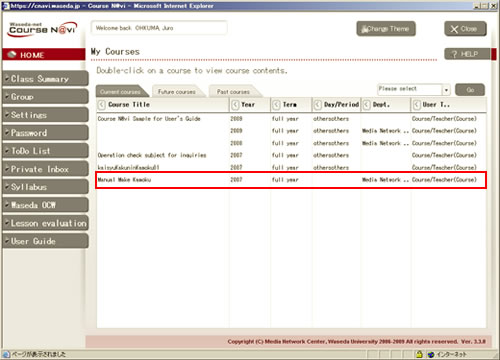
- In the My Courses window, double-click the course for which you want to use the review sheet.
- [Lecture] window will displayed.
Choose [Create] then from the [Operation menu] choose [A single Lecture] and click.
Here, the procedure is explained by using [A single Lecture]. You can also display the review sheet by using [Multiple lectures].
- Create a lecture in the same way as LectureMake. In this process, check [Yes(Use)] for the [Use Lecture Evaluation?] option and click thebutton.

- Reference
- “Items to set for the Lecture Evaluation(review sheet)”
- Click the.
The “Lecture Evaluation” is registereda href=”https://wnpspt.waseda.jp/teacher_en/course_navi/wp-content/uploads/sites/2/2007/09/5-1-4_04.jpg”>
.- If you want to display the Lecture Evaruation for an existing lecture, you can change the review sheet settings in the LectureEdit window.
- Reference
- About editing a lecture ⇒ “05-02-01. Editing basic information“
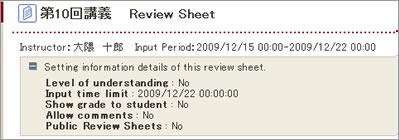
Items to set for the Lecture Evaluation (review sheet)
| Item | Description | Remarks |
|---|---|---|
| Use Lecture Evaluation? | Set whether to display the Lecture Evaluation(review sheet). | Select [Yes] or [No]. |
| Manage attendance? | Set the message to be shown to the student. | |
| Completion time limit | Enter the number of days allowed to pass from the lecture start date before completion. | Enter this item when you want to set a time limit.
|
| Full marks | Enter the full marks. | |
| Show grade to student? | Select whether to show the grade to the student. | Select [Yes] or [No]. |
| Allow comments? | Comments can be made in review sheets and feedback. | Select [Yes] or [No]. |
| Level of understanding | You can have the student enter his or her level of understanding. | Select [Include] or [Exclude]. The student can select from “0: Blank,” “1: Did not understand at all,” “2: Did not understand very well,” “3: Just about understood,” “4: Understood fairly well,” and “5: Understood very well. |
| List members in order of | Set the order in which students are listed. | Select from “Student ID / Teacher ID (ascending),” “Student ID / Teacher ID (descending),” “Attendance record (ascending),” and “Attendance record (descending).””Submitting is not considered” If you check “Submitting is not considered,” students are listed in the specified order, regardless of whether they have submitted review sheets or not. If submitting is considered, students who have not submitted review sheets are listed after those who have. |
| Character number check | Enter this item to limit the number of characters that the student can enter in the review sheet. | Enter the range of character numbers to be checked. The size of the text box is automatically determined by the entered maximum number of characters. The text box may be up to 30 lines (it automatically scrolls as characters are entered). |
| When number of characters exceeds limit | Set how the system is to behave if the number of characters exceeds the set limit. | Select “Display number of characters entered only,” “Display warning,” or “Do not accept.” |
| List view | Set the display format of the Review Sheet window. | Select “Open” or “Closed.” |
| Public Review Sheets | Set whether to disclose the review sheet. | Select “Disclosure” or “Nondisclosure.” If you select “Disclosure,” enter the start date as well.
<Window used by the student>
|
| The name of the student to display | Set whether to display the student name when disclosing the review sheet. | Select from [Yes], [No], and [Nickname only]. |
- Memo
- The information set in student mode is displayed.
Viewing the review sheet
- Choose [Edit] then from the [Operation menu] choose [Lecture Evaluation] and click the.

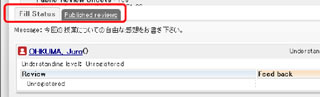
- The Review Sheet Management window appears. Click the [Review Sheet] link for the lecture you want to view.

- Memo
- By clicking a [Lecture Evaluation] link in the Lectures window, it is also possible to go to the Review Sheet window for the corresponding lecture.

- The Lecture Evaluation window appears.
If you have any comment on the student’s comment, enter your comment in the [Instructer Comment] and click thebutton. Clicking [Comments] allows you to make additional comments.
You can also enter a review in place of the student.

- When making an additional comment on the student’s or teacher’s comment, you can decorate the text.
- Memo


(1) You can decorate the text.
Bold, italics, underline, font color change, background color change, left alignment, centering, right alignment, indent setting, font size
(2) You can edit the text.
Copy, paste, cut, undo (redo)
(3) You can insert files and tables.
URLs can be linked.
(4) You can set the input window.
You can switch from the HTML format display to the screen image.
The window size can be changed.
(5)You can use the equation editor “BrEdiMa.”
- Memo
- Clicking thebutton allows you to quote the review or feedback.

- Memo
- Differences between questionnaires and review sheets
While students can compare review sheets of different lectures, they cannot do so with questionnaires.
With review sheets, the grade can be disclosed only to the student concerned.
Questionnaires may be answered anonymously, while review sheets cannot be anonymous.
Calculation results of questionnaires may be disclosed, while those of review sheets cannot be disclosed.
<Review sheet for each lecture>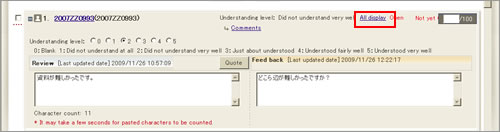
If you click “All display” to the right of the student name in the Review Sheet window, you can display a review sheet list for each target student.
<Review sheet for each student>
- Reference
- “06-03-01. Creating a questionnaire“
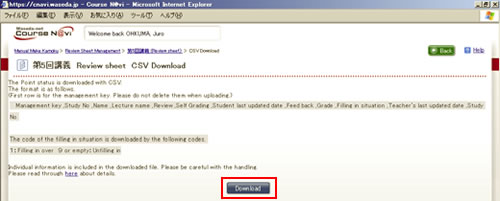
Registering grades using the download and upload functions
Using the CSV download and upload functions, you can register multiple grades at once.
- Select the students whose grades you want to register, select [Download a CSV File], and then click thebutton.

- Memo
- If you do not check any of the checkboxes, all students will be selected.
- After reading the caution, click thebutton.
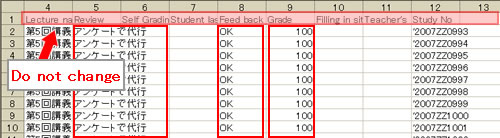
- Open the downloaded file. You can enter Grade, Review, Level of understanding, and Feedback.
- Memo
- Do not change the titles of the items in the top row. Otherwise, the file cannot be uploaded appropriately.
- You can only fill in empty fields but not the other way round.(To make any filled field empty, use “Delete (Back to no registration)” in the operation menu in teacher mode.)
If you enter data in any of the Grade, Review, Level of understanding, and Feedback fields, all these fields including empty fields are regarded as filled fields and updated as such.
- Note
- In “Grade,” enter grades using single-byte characters.
* If double-byte characters are used, they are shown in double-byte form in the CSV file while they are forcibly converted to single-byte characters when the file is uploaded and reloaded.
- Memo
- To use your own Excel file, copy and paste your Excel file data to the downloaded CSV file.
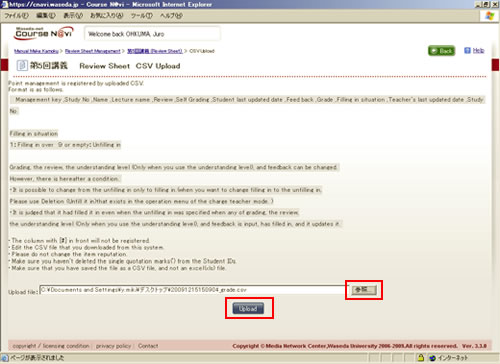
- Upload the CSV file in which you have entered necessary data. Select [Upload a CSV File] and click.

- When the CSV Upload window appears, clickand specify the file in which you have entered necessary data. After specifying the file, click.